博客

  • NuGet系列-製作安裝Package時自動設定Config

    在NuGet還沒有出來前要在專案中加入組件的相關Config是挺麻煩的,要看著文件或範例來一段一段複制貼上Config,說真的不是很方便,但是NuGet有提供Config轉換,會把需要設定的Config合併到專案的Config中,可以省下不少設定時間,這篇就來跟大家說在建立Package時如何加入Config轉換檔。

    建立Config轉換檔

    準備一個僅安裝時需要的Config檔,如下範列是我在製作Common.Logging.Elmah時的設定。

    01
    <configuration>

    02
    <configSections>  

    03
    <sectionGroup name="common">

    04
    <section name="logging"t ype="Common.Logging.ConfigurationSectionHandler, Common.Logging"/>

    05
    </sectionGroup>

    06
    </configSections>  

    07
    <common>

    08
    <logging>

    09
    <factoryAdapter type="Common.Logging.Elmah.ElmahLoggerFactoryAdapter, Common.Logging.Elmah">

    10
    <arg key="Level" value="all"/>

    11
    </factoryAdapter>

    12
    </logging>

    13
    </common>

    14
    </configuration>

    NuGet的Config檔的轉化檔在設計上很簡單,就跟平常在設定Config一樣一樣,相對的它沒有辦法做太多事,只能以XML的DOM,一個一個比對element的階層與內容,沒有完全相同的element就新增,如果element相同,但有一個attribute相同會合併設定,完全相同就略過,以下面的例子為例:

    App.Config內容

    1
    <configuration>

    2
    <appSettings>

    3
    <add key="SetA" />

    4
    <add key="SetB" value="App.Coinfg" />

    5
    <add key="SetC" value="Same" />  

    6
    </appSettings>

    7
    </configuration>

    App.config.transform(transform為轉換檔的副檔名)內容

    1
    <configuration>

    2
    <appSettings>

    3
    <add key="SetA" vaule="Transformation" />

    4
    <add key="SetB" value="Transformation" />

    5
    <add key="SetC" value="Same" />

    6
    <add key="SetD" value="Transformation" />

    7
    </appSettings>

    8
    </configuration>

    合併後的結果

    1
    <configuration>                               //完全一樣,不處理

    2
    <appsettings>                               //完全一樣,不處理

    3
    <add key="SetA" value="Transformation" /> //一個Attribute相同,合併

    4
    <add key="SetB" value="App.Coinfg"/>     //雖然有一個Attribute相同,但另一個Attribute不同,不處理

    5
    <add key="SetB" value="Transformation" /> //雖然有一個Attribute相同,但另一個Attribute不同,新增

    6
    <add key="SetC" value="Same" />           //完全一樣,不處理

    7
    <add key="SetD" value="Transformation" /> //沒有,新增

    8
    </appsettings>                            

    9
    </configuration>

    如果要寫某種情境下才新增設定,那就不能用Config轉化檔,可能要在NuGet的PowerShell安裝檔中寫Code來處理。

    加入Package中

    轉換檔的副檔名是.transform,只要將準備好的config的檔名後方加上.transform即可,如果是要轉換web.config,就建立web.config.transform,如果是要轉換app.config,就建立app.config.transform,並加入Package中的Content下,加入的方法有:

    如果組件可以用在Web或Windows Form,可以同時準備web.config.transform、app.config.transform,這二個檔案,當安裝Package時,會比對目錄下(放在Content下相對於專案根目錄)有沒有扣除.transform檔名的檔案,如果有才做轉換,如果沒有不做轉換也不會在專案中增加檔案。

    image

    安裝與移除Package

    有Config專案的Package在安裝上沒有不一樣,使用平常的安裝方法及可,但在移除上可能要注意,因為NuGet Config轉換除了安裝時會合供,移除時會刪除合併,不過只有跟轉換檔相同的element才會刪除,因為安裝後通常會改設定值,應該有些比對不成功,會刪不乾清。

    參考資料

    Configuration File and Source Code Transformations

    转自: http://www.dotblogs.com.tw/wadehuang36/archive/2011/10/16/nuget-config-transform.aspx

  • The user identity cannot change during an active SignalR connection

    The user identity cannot change during an active SignalR connection

    This error may be seen if authentication is being used, and the client is logged out before the connection is stopped. The solution is to stop the SignalR connection before logging the client out.

    无法识别的用户标识。在 SignalR 连接处于活动状态期间无法更改用户标识

    官方有详细的文档:

    http://www.asp.net/signalr/overview/signalr-20/troubleshooting-and-debugging/troubleshooting

  • jenkins部署经验分享

    1.内网安装插件

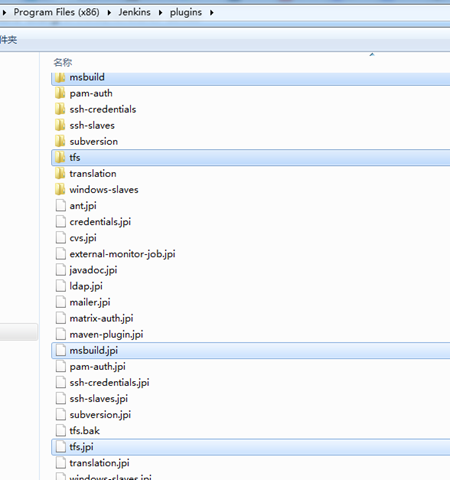
    如果在内网安装Jenkins插件,可以考虑在有外网的地方安装完插件,把插件目录下对应的文件夹及文件Copy到内网。 Jenkins有丰富的插件: http://localhost:8080/pluginManager/ 

    如:

    image

    2.配置TFS及MSBuild

    访问:http://localhost:8080/configure  可以配置TFS\MSBuild

    如果不想这么配置的话,直接在环境变量里加上:(不推荐哈)

    C:\Program Files\TortoiseGit\bin;C:\Program Files (x86)\VisualSVN\bin;C:\Program Files (x86)\Microsoft Visual Studio 12.0\Common7\IDE;C:\Program Files (x86)\MSBuild\12.0\Bin

    3.TFS配置注意事项:

    http://xxx.xxx.xxx.xxxx:8888/tfs/DefaultCollection    不要忘记DefaultCollection

    4.MSBuild配置注意事项:

    /p:Configuration=Sharepoint /p:VisualStudioVersion=12.0 /p:DeployOnBuild=true /p:PublishProfile=”C:\Program Files (x86)\Jenkins\workspace\xxxprj\Web\Properties\PublishProfiles\Jenkins.AutoDeploy.pubxml“

    编译完之后,可以再执行一些cmd命令

    建议使用VS先创建一个发布配置,这样子直接在MSBuild中可以使用。

    5.参考配置:

    <?xml version='1.0' encoding='UTF-8'?>
    <project>
      <actions/>
      <description></description>
      <keepDependencies>false</keepDependencies>
      <properties/>
      <scm class="hudson.plugins.tfs.TeamFoundationServerScm" plugin="tfs@3.1.1">
        <serverUrl>http://xxxx.xxxx.xxx.xxx:xxxx/tfs/DefaultCollection</serverUrl>
        <projectPath>$/xxxx.Web</projectPath>
        <localPath>.</localPath>
        <workspaceName>Hudson-${JOB_NAME}-${NODE_NAME}</workspaceName>
        <userPassword>cGFzczAxIQ==</userPassword>
        <userName>xxxx\dq</userName>
        <useUpdate>true</useUpdate>
      </scm>
      <canRoam>true</canRoam>
      <disabled>false</disabled>
      <blockBuildWhenDownstreamBuilding>false</blockBuildWhenDownstreamBuilding>
      <blockBuildWhenUpstreamBuilding>false</blockBuildWhenUpstreamBuilding>
      <triggers/>
      <concurrentBuild>false</concurrentBuild>
      <builders>
        <hudson.plugins.msbuild.MsBuildBuilder plugin="msbuild@1.23">
          <msBuildName>(Default)</msBuildName>
          <msBuildFile>IFund.Web.sln</msBuildFile>
          <cmdLineArgs>/p:Configuration=Sharepoint /p:VisualStudioVersion=12.0 /p:DeployOnBuild=true /p:PublishProfile=&quot;C:\Program Files (x86)\Jenkins\workspace\xxx.Web\Properties\PublishProfiles\Jenkins.AutoDeploy.pubxml&quot;</cmdLineArgs>
          <buildVariablesAsProperties>false</buildVariablesAsProperties>
          <continueOnBuildFailure>false</continueOnBuildFailure>
          <unstableIfWarnings>false</unstableIfWarnings>
        </hudson.plugins.msbuild.MsBuildBuilder>
        <hudson.tasks.BatchFile>
          <command>xcopy /E /C /Y &quot;C:\Jenkins\Web&quot; &quot;C:\target&quot;
    xcopy /E /C /Y &quot;C:\Jenkins\workflow&quot; &quot;C:\target\workflow\&quot;</command>
        </hudson.tasks.BatchFile>
      </builders>
      <publishers/>
      <buildWrappers/>
    </project>

    6.参考文章

    http://nakedalm.com/configuring-jenkins-talk-tfs-2013/

    http://www.ganshani.com/blog/2014/03/build-automation-using-jenkins-and-tfs-repository/

    如遇到问题,可以查看日志

  • Build Automation Using Jenkins and TFS Version Control

    I’ve used several version control systems for my source code and research projects.  Recently, I’ve consolidated them to TFS and Git. I have started using Visual Studio Online for my research work, CodePlex for my Open Source Frameworks and Tools and GitHub for my blog code.  Much of these decisions are driven based on the target audience and the nature of my work (code).  TFS, being an excellent ALM tool, offers more than just a version control system which can be particularly helpful when you are either having large teams to work with or have an open-source project whose build you would want to automate.  For my research development (that happens at home), I was keen on build automation for CInject project.

    Visual Studio Online offers a complete package of Continuous Integration and Delivery to Azure Services but there is no such feature for TFS repositories of CodePlex.  For this case, I started evaluating other CI platforms like CruiseControl.NET, TeamCity and Jenkins.  I zeroed down on Jenkins for its ease of use, extremely light-weight deployment, my familiarity with it and zero-dollar cost in setting it up.

    For this example, we would use CodePlex repository, but the method can be used with any on-premise TFS repository or even with Visual Studio Online

    Downloading the latest version

    A direct link to Windows Version of Jenkins is available here.  Installation of this will require administrative rights if you are doing it on Windows 7+, or Windows Server 2008+

    Once the installation has been completed, you will have a service running in the Service Manager

    image

    If this service is running, you can access Jenkins console at: http://localhost:8080/

    Download TFS Plugin

    Visit the Manage Plugin Page [Manage Jenkins > Manage Plugins > Available ] (shortcut) and search for Team Foundation Server plugin.  Click on the checkbox and press the button ‘Install without restart’

    image

    If your build machine/server has restricted access to the Internet, you will get an error downloading the file.

    java.io.IOException: Failed to download from http://updates.jenkins-ci.org/download/plugins/tfs/3.1.1/tfs.hpi
        at hudson.model.UpdateCenter$UpdateCenterConfiguration.download(UpdateCenter.java:781)
        at hudson.model.UpdateCenter$DownloadJob._run(UpdateCenter.java:1125)
        at hudson.model.UpdateCenter$InstallationJob._run(UpdateCenter.java:1285)
        at hudson.model.UpdateCenter$DownloadJob.run(UpdateCenter.java:1103)
        at java.util.concurrent.Executors$RunnableAdapter.call(Unknown Source)
        at java.util.concurrent.FutureTask$Sync.innerRun(Unknown Source)
        at java.util.concurrent.FutureTask.run(Unknown Source)
        at hudson.remoting.AtmostOneThreadExecutor$Worker.run(AtmostOneThreadExecutor.java:104)
        at java.lang.Thread.run(Unknown Source)

    In such cases, you need to download latest version of the plugin manually and copy it to

    <<JenkinsInstallDirectory>>\plugins

    image

    You will need to restart Jenkins service if you had to install it manually.

    Downloading Team Explorer Everywhere

    If you are running this process on your desktop machine and you are a .NET developer, chances are that you would have Visual Studio 2012+ installed.  In such cases, you will have Team Foundation executables on your machine and also the path of TF executables will be mentioned in PATH system variable as well.

    When TF executable path is not part of PATH system variable, you will have to configure Jenkins to look into the right directory (shortcut).  On my home laptop, I’ve configured it as,

    image

    If you are running this on your Windows Server which has only .NET framework installed, you will have to install TEE.  If you are running this on a Unix/Linux server, you will still need TEE.  This is a free executable from Microsoft and is very thin-client.  You can download and install it from here and setup the configuration as

        X:\Jenkins\TEE-CLC-12.0.1\TEE-CLC-12.0.1\tf.cmd
    

    You would need to run tf eula on Command Prompt to accept the Agreement of Use and Terms and Conditions and press ‘y’ when it prompts.  Similar configuration needs to be done for Unix / Linux.  The same CMD file will work for Unix and Linux platforms.

    Setting up TFS repository in Jenkins

    Click on the New Job link on the left menu to create a new Build Profile (shortcut)

    image

    On the next screen, you can customize the configuration to enable concurrent builds, retry count, etc. But for this article, the focus would be to configure TFS workspace.  So to get the TFS configuration, visit your CodePlex framework page and get the TFS URL.  If you are configuring for a repository other than CodePlex, you can check the URL with your administrator

    image

    Copy the link to Jenkins as shown below and click on Apply

    image

    Now you can trigger Build for environment and it should build successfully. 

    You can use this method with any TFS repository – On-premise as well as Visual Studio Online.  One thing worth noting here is – every TFS repository (herehttps://tfs.codeplex.com:443/tfs) has multiple collections (TFS01…. TFSxx) and each collection has projects.  The Server URL should include the name of the collection, whereas the Project path should be a relative path ($/…)to the actual project. 

    Using CodePlex SVN Path with Jenkins

    You can use SVN link to access the Codeplex repository as well.  Please note that if you are using a non-Codeplex repository, you may not have a SVN URL.

    image

    So you can opt for any method if you are using Jenkins for CodePlex and can setup Build Automation and Continuous Integration as well.

    Hope this helps.

    Published at DZone with permission of Punit Ganshani, author and DZone MVB. (source)

    (Note: Opinions expressed in this article and its replies are the opinions of their respective authors and not those of DZone, Inc.)

    Tags:

    The DevOps Zone is presented by PagerDuty and New Relic. Triage app problems fast andresolve incidents faster.

    from:http://java.dzone.com/articles/build-automation-using-jenkins?utm_source=tuicool

  • 相关 ID: 4b90ae9c-ce31-9067-856b-e87a9e10a580

    相关 ID: 4b90ae9c-ce31-9067-856b-e87a9e10a580

    龟毛的Sharepoint!

  • Microsoft JET Database Engine -2147467259

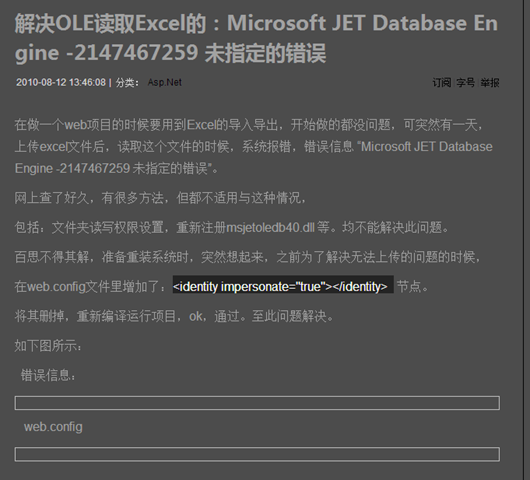
    解决OLE读取Excel的:Microsoft JET Database Engine -2147467259 未指定的错误

    image

    转自:http://blog.163.com/rock_82/blog/static/1450898920107121392346/